Specialty Drill Bits Guide: No-Crack Glass & Tile Techniques
By Casey Bennett • 16th Oct
If you've ever stared at a spiderwebbed tile or shattered glass after drilling, you know that frustration all too well. As a specialty drill bits guide, this article cuts through the confusion with field-tested techniques that actually prevent cracks. Confidence comes from small wins with the right setup, and that starts with matching your drill bits to your project, not just buying the shiniest option. I remember helping a neighbor tackle bookshelf anchors after stripped screws ruined his confidence. We dialed down the clutch, marked the pilot holes, and used a compact drill with the right glass bit. That first clean hole? It unlocked a whole weekend of fixes. Let's make your project that breakthrough moment.
Why Glass and Tile Crack (And How to Stop It)
Unlike wood or metal, brittle materials fail under sudden stress. Here's what happens when bits chatter or overheat:
- Heat buildup from friction creates micro-fractures (especially in glass)
- Sideways pressure from wandering bits catches edges, causing chips
- High RPM makes bits vibrate at the surface rather than penetrate
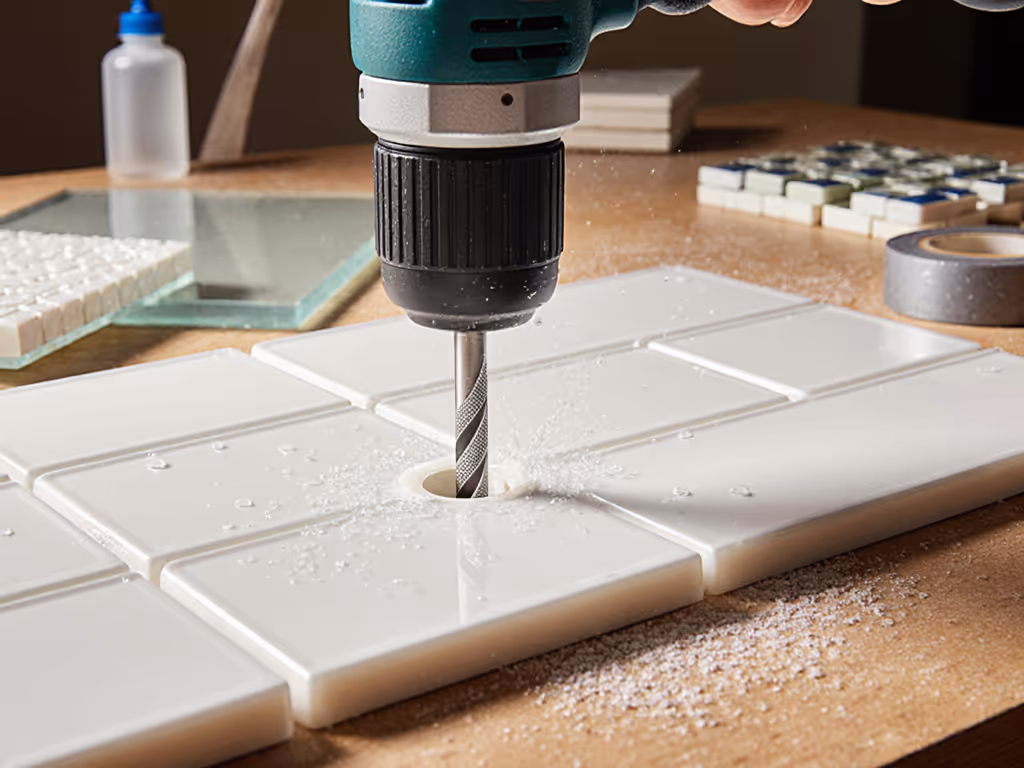
The fix isn't magic, it's methodical. Start with moisture control:
Moisture cools the tip AND flushes away abrasive dust. Water droplets in a spray bottle beat costly coolant systems for DIYers. Mist the surface every 10 seconds while drilling, enough to keep the dust slurry damp but not pooling.

Core Principles for Flawless Holes
1. Speed & Pressure: Less Is More
Critical rule: Drill glass and tile at 400-600 RPM max. Yes, your drill feels sluggish, but that's good. Fast spins fracture brittle surfaces. Apply light, steady pressure (like pressing a gel pen through paper). If smoke appears, you're burning the material. Back off instantly. If you're unsure how RPM and clutch settings translate to real-world drilling, see our guide to understanding drill specifications.
2. Bit Selection: Shape Over Specs
Forget "hardest material" claims. Look for these features:
- Spear-point carbide tip (not diamond-coated for basic tiles)
- Flat grinding edges that grind instead of punching
- 3-fluted design for cleaner chip removal
For ceramic wall tiles, a standard tile drill bit suffices. Porcelain? Step up to diamond-grit or reinforced carbide. Glass always needs a specialized spear point, regular masonry bits chip it instantly.

BOSCH GT2000 4-Piece Carbide Tipped Glass
Precision glass and tile drilling, solving bit wandering and slippage.
$15.95
Included Sizes1/8 in., 3/16 in., 1/4 in., 5/16 in.
Included Sizes1/8 in., 3/16 in., 1/4 in., 5/16 in.
Pros
Precision tip prevents bit wandering and walking
High-quality carbide tip with reinforced head reduces stress
Versatile for glass, tile, bathroom installs, and more
Cons
Mixed feedback on quality and durability concerns
May dull quickly or break on tough materials like stoneware
Customers find the drill bits work quickly and safely, offering great value for money. However, the quality receives mixed feedback, with some finding them very good while others consider them low quality. Moreover, durability is a concern as the bits break during use, particularly when drilling through stoneware, and become dull after a few uses. Additionally, customers report issues with accuracy, noting they wouldn't drill through standard porcelain floor tile.
Customers find the drill bits work quickly and safely, offering great value for money. However, the quality receives mixed feedback, with some finding them very good while others consider them low quality. Moreover, durability is a concern as the bits break during use, particularly when drilling through stoneware, and become dull after a few uses. Additionally, customers report issues with accuracy, noting they wouldn't drill through standard porcelain floor tile.
Your Top Questions Answered
"Which drill bit works for both glass and tile?"
Short answer: Carbide-tipped spear points (like Bosch's GT series) handle ceramic tile and thin glass if you respect their limits. They struggle with thick porcelain or tempered glass. Never use them on wood afterward. They dull fast on softer materials. For frequent glass work, keep dedicated bits. It's cheaper than redoing a $200 backsplash.
"How do I drill acrylic without cracking?"
Acrylic drilling without cracking requires even gentler handling:
- Drill at 300 RPM (yes, that slow!)
- Back out every 1/8" to clear melted plastic bits
- Place scrap wood underneath to prevent blowout
- Pro tip: Warm the acrylic with a hairdryer first, cold plastic shatters easier
"What about composite materials?"
Composite material drilling (like Corian or cultured marble) needs a hybrid approach:
- Medium speed (500 RPM)
- Light pressure + frequent clearing
- Bits with wider flutes to evacuate gummy dust
- Test on scrap first! Some composites behave like glass, others like soft stone
Pro Tips for Real-World Confidence
The Anchor Trick You'll Use Daily
Tape the drilling spot with masking tape in a tiny X. It:
- Catches the bit tip so it doesn't skate
- Holds surface particles together
- Gives a visual aiming point (no more "is this where I wanted it?")
Safety First, Always
- Wear safety glasses with side shields, glass shards travel sideways
- Secure your piece with non-marring clamps (never hold by hand) For PPE, handling techniques, and hazard prevention, see our Power Drill Safety Guidelines.
- Mind your body position - stay balanced to avoid jerking the drill
Set the clutch before the screw
This isn't just for driving screws! On tile projects, set your clutch to its lowest setting. Why? If the bit binds, the clutch slips instead of shattering the tile. It's the emergency brake you hope you never need. I've saved three shower tiles this way.
Beyond the Basics: When to Upgrade Your Approach
For thick porcelain or subway tile, consider an Alpha Drill Bit Guide with water delivery (you'll find these at tile supply shops). The suction cup holds the bit perfectly vertical while cooling water flows directly to the tip. If you struggle to keep the bit aligned, follow our drill straight holes guide for tip support and angle control techniques. It's overkill for a single mirror mount, but for a full bathroom remodel, it's worth every penny in reduced stress.
Your Next Steps
Start small: Grab a scrap tile from your home center's clearance bin. Practice drilling through it at 400 RPM with light pressure. When you get that first clean hole, you'll understand why my neighbor now tackles tile projects without dread. Remember, success isn't about the fanciest drill. It's about start[ing] with the project, then match[ing] the drill and batteries.
Ready to tackle your project? Drop your toughest glass or tile drilling question below, and I'll help you troubleshoot it step-by-step. And if you've got a cracking story (or victory!), share it. We've all been there, and your experience might be the tip someone else needs.
Related Articles